How to Set up Facebook Dynamic Product Ads for Remarketing
Dynamic remarketing with Facebook Dynamic Product Ads allows you to show users products they viewed on their site as automated ads. Learn how to set it up!
In an online world increasingly smothered in overtly sponsored content, it’s never been more important to personalise your ads to make sure you’re not flushing those pricey clicks down the toilet.
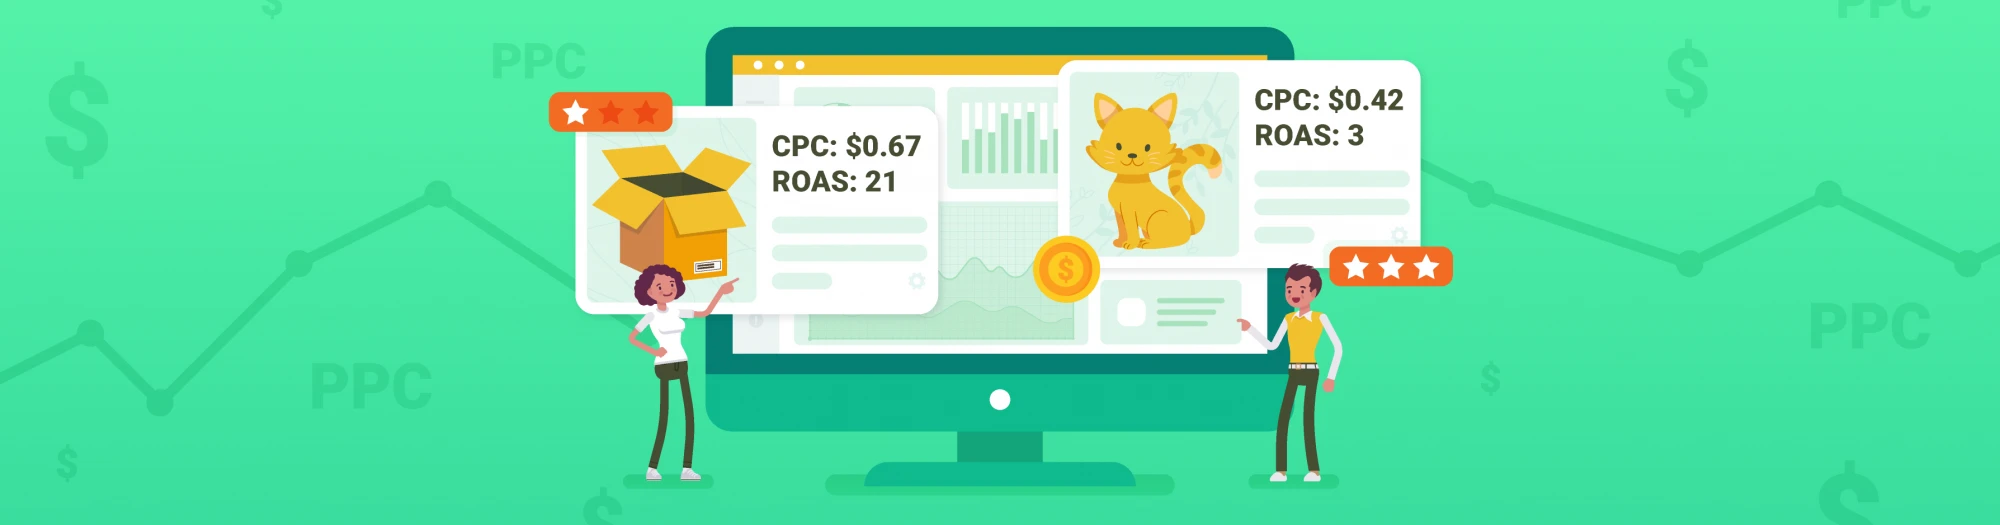
Remarketing on Facebook is a great way to target your website visitors, page fans, or app users with content that they are likely to engage with. The ads look natural, and characteristically remarketing campaigns deliver higher click-through-rates, a dirt cheap cost-per-click, and a higher than average conversion rate.
I would go as far as to say that if you are running any other paid traffic campaigns, be that on social media, Google Adwords or elsewhere, you are burning money if you are not remarketing to those clicks.
While remarketing to your visitors as a single group is certainly a good start, you can unlock even greater potential by targeting individual users with ads that are defined by their activity on the site. In the past it was left up to third party tools to provide this kind of service, but thankfully Facebook offer their own easy-to-use system for these personalised ads, which we call dynamic remarketing or dynamic product ads.
The process of getting your dynamic product ads up and running is made up of quite a few steps. In this article I’m going to cover the whole process from start to finish, so if you want to skip through to a seperate section, here’s the running order…
Part 1: The benefits of dynamic remarketing – why bother?
Part 2: How to create dynamic product ads
Creating the Data Feed
Upload your Feed to Facebook to Create Your Catalog
Setup Your Pixel Events
Segmenting Your Catalog With Product Sets
Creating Your Dynamic Product Ad Campaigns
Part 3: Funnel Focus: A Great Starting Strategy
Part 1: The benefits of dynamic remarketing
Before we get stuck into the nuts and bolts of setting up your first dynamic remarketing campaign on Facebook, let’s take a brief look at some of the reasons why you should bother.
Save Time by Automating Ad Creation

Are you sick of creating endless ad variations, updating your campaigns with fresh text, images and landing pages? While split testing is important, it can be time consuming, and often the goal is simply to serve your audience with the most targeted creative you can.
Dynamic product ads allow you to create a single, or a few, simple ad templates which populate with content dynamically. That means, an almost infinite supply of targeted ads, for the blood, sweat and tears of creating just one or two.
Beat Ad Fatigue and Keep CTR High

Unfortunately, despite your creative genius, the more users see your ads, the less likely they are to click through, leading to diminishing returns on your ad spend. This is known as ad fatigue, and is particularly prevalent on channels which heavily rely on the initial visual impact of the ad and headline to attract the click. Hence all that click-bait on Facebook.
Remarketing products that users have previously viewed keeps click-through-rates high, which in turn reduces cost-per-click. Users are more likely to see a variety of ad creatives, helping to reduce banner blindness so that they stay receptive to your ads for longer.
Cross-Sell Users Related Products

Through creative use of collections in your dynamic product ads, it’s possible to cross-sell users alternative or complementary products. This is a great way to promote products across a collection to users that you know are shopping for something in that category.
Don’t Waste Money on Out-of-Stock Products
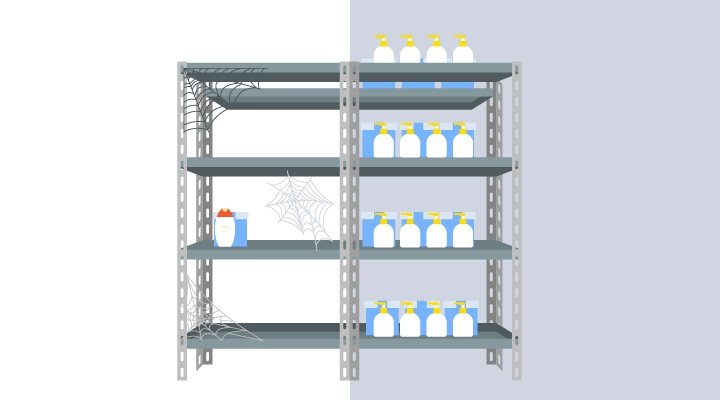
When you sell out of a particular product, it can take a few days, weeks or in some cases months for your marketing team to get an update from inventory. For larger e-commerce stores, effective stock management can be a huge job, and some wastage on advertising out of stock products is inevitable.
Using dynamic remarketing automatically connects your ads to your inventory, so users don’t see any advertising for products that are not available for immediate purchase.
Part 2: How to set up dynamic product ads
There are a few steps required to get your dynamic product ads live, and also a few choices to make along the way. For the purpose of this article, I’ll assume that you already have a working Facebook Business & Ad Manager account, and our examples will be centred around e-commerce as this is the most common use case.
To get started you will need to create a product feed. This is essentially a list of all of your products and their various attributes, and are usually the first and only hurdle at which brands fall and fail in their quest for marketing automation greatness.
Not anymore!
Creating the Feed Document
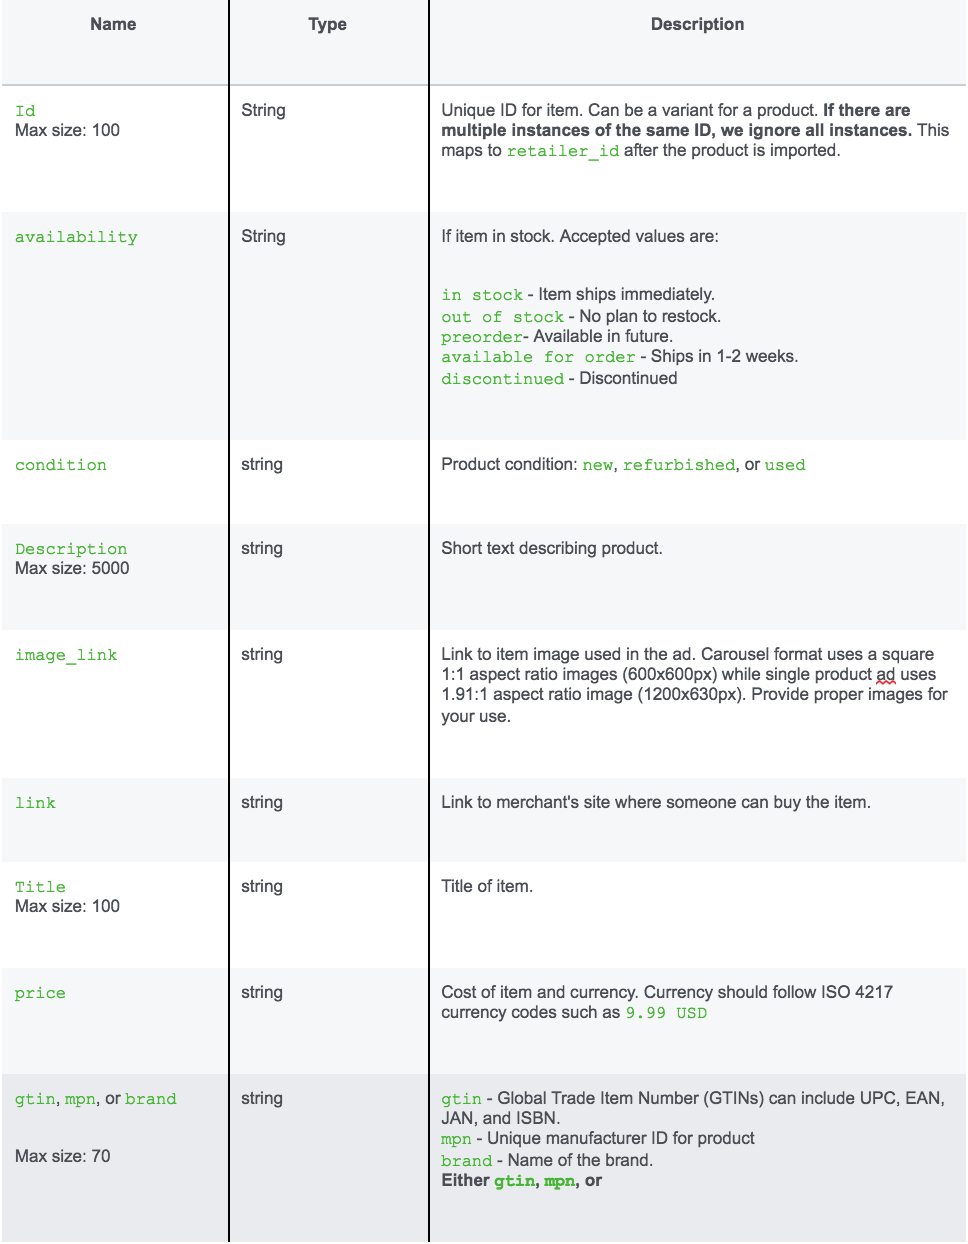
Facebook gives some great guidelines on how to configure your product feed for dynamic retargeting in this article.
They cover the setup of the catalog itself, but also the individual attributes which are required for each product. Some of these are essential, and others are optional additional information. Here’s a summary table of all the essential attributes.
If you have created a feed in the past for Google Shopping / Product ads, you will notice that the attributes almost exactly the same. This means that if you already have a feed c
onfigured, as long as your data fits within the required word counts, and images are formatted correctly, you should be able to use the same feed for both purposes.
It is rarely mentioned that the Facebook product catalog is almost identical to the Google Merchant Center feed, and in the vast majority of cases you can use the exact same feed with no modifications!
One really important point is to consider your choice of image format. The aspect ratio of the image link you upload is going to define which creatives you can use for your dynamic ads. If you want to advertise multiple products then you should stick to a 1:1 ratio to fit the link carousel format. Also, your images should be at least 600px x 600px, which is larger than the minimum requirement for Google Shopping, so your feed might need to be updated accordingly.
I will also mention specifically the final required attribute of GTIN, MPN or brand, as this can also create a bit of confusion.
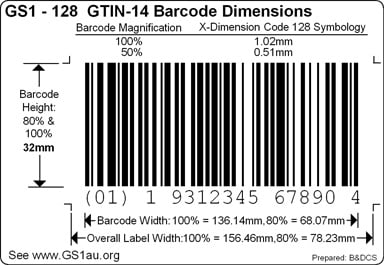
A GTIN or MPN number is essentially a barcode or serial, which is given as a unique identifier to a product by its original manufacturer. These codes are only required when you are selling products made by a third party. If you are selling your own products, then just include the name of your brand or SKU in this field.
The GTIN and MPN numbers are required by resellers for the Google Shopping feed, but Facebook seems to be happy with just listing the product’s original brand. It’s a little strange as it was flagged as a legal requirement by Google, but perhaps either times have changed, or Facebook are a little more lax with the regulations.
The rest of the attributes are pretty self explanatory. For you titles and descriptions, I usually use the SEO optimised meta title and description of the product page, but if you would like to customise a completely unique title, you can do so.
Once you are happy with your feed, you can either save it as a CSV or XML file (there are other formats available but these are the most common), and you’re ready to move on to phase two!
Upload Your Product Feed to Facebook
To connect or upload your product feed, open the top left menu in your Business Manager account, go to All Tools and then select Catalogs.
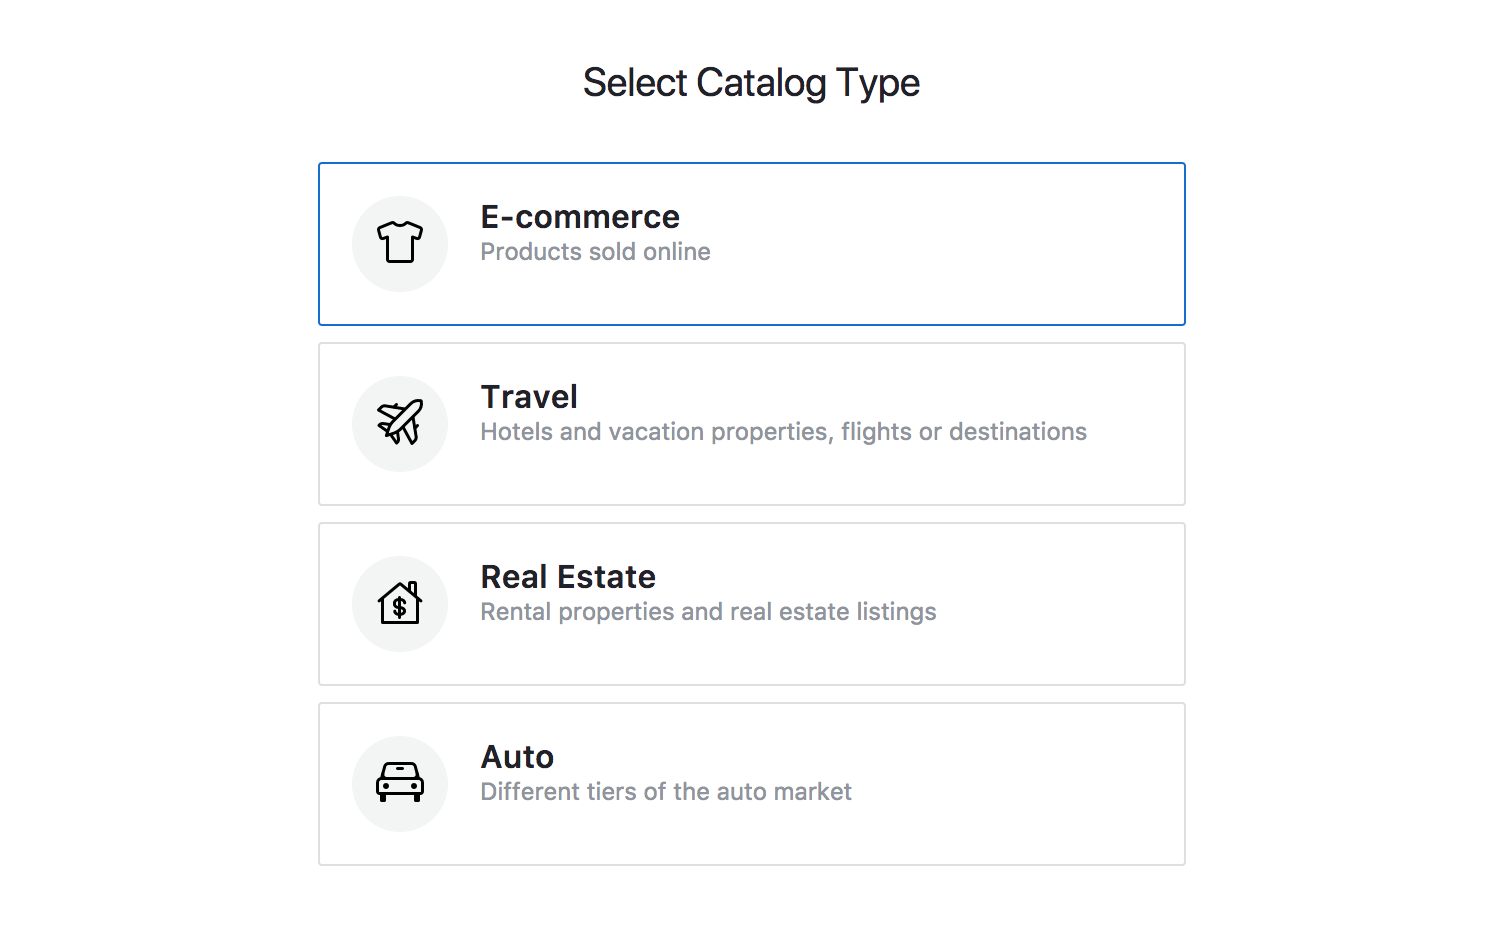
From here you will be prompted to Create Catalog, and then give it a name. In addition to regular products, there are options to create specific feeds for flights, hotels, travel destinations and real estate listings, as different attributes are required for these ads.
You can also choose the feed owner, so if you are working as a team and have admin access to your business manager account, you could give ownership to that business account.
Now we have named our catalog, we are prompted to Add Data Feed. Again we must give it a name, and then select the currency in which we want prices to be displayed, so in this case AUD.
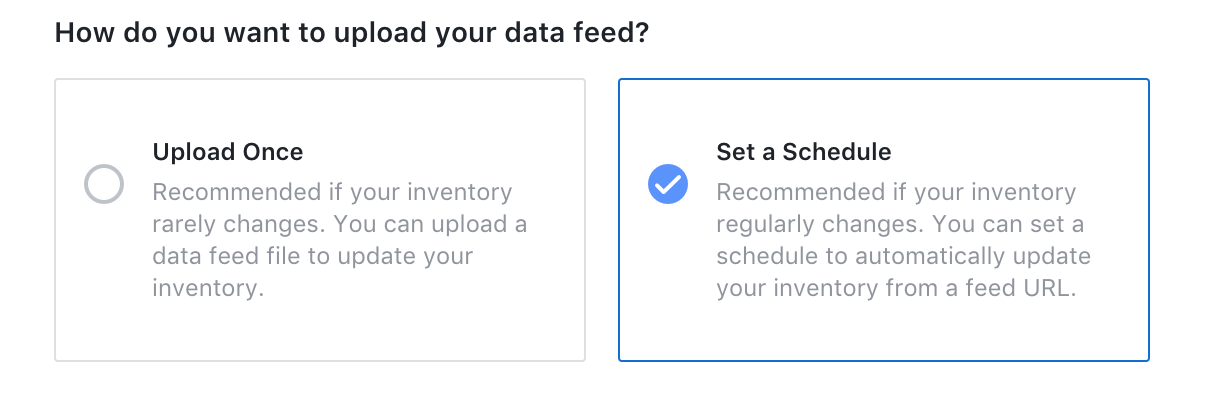
There are two options when selecting the Upload Type. The Single Upload method allows you to add a spreadsheet file in CSV, XML and a few other formats. This approach requires you to make manual updates to your sheet if the inventory levels of your products change. This approach is perfect for businesses selling digital products without inventory, such as software or online courses, as there is very little maintenance once the sheet is uploaded.
The Scheduled Recurring Upload method requires you to host your feed online via a URL, and define how often it should be downloaded and updated so that your ads are up to date. This is very important for businesses selling physical products as they will want to avoid advertising products which are sold out or no longer available.
There are a number of ways to create this online hosted product feed, and which you choose will depend largely upon your e-commerce platform, or the skill of your developer. Most major platforms, such as Shopify, Magento, BigCommerce, or WordPress (with WooCommerce) offer a plugin that connects to your store and generates this feed without too much configuration.
If you are using the Single Upload type you simply can create a spreadsheet with some basic attributes. However, if you have a lot of products, you might want to use a plugin anyway, as it will allow you to automate parts of the process such as automatically pulling product featured images from your site to be used in your ads.
Once your file is uploaded, Facebook will flag any issues to you, highlighting rows that fail to meet the criteria. By navigating to the All Columns tab on the same page, you can map your column titles to a Facebook friendly field. This is great if you are using a product feed designed for another source (such as Google Shopping) as it can be easily figured to match the Facebook specification without having to create a separate file.
Next you will be navigated to the Data Feeds page, which gives you a really useful summary of the feed as a whole. You can see how many products you have, and even view them with their images by navigating to the Products tab on the left side.
There are also settings that you can use to adjust your upload method, edit the configuration of your feed, or delete it all together.
Now your feed is ready to roll, it’s time to check that our Facebook pixel is correctly configured.
Setup your Facebook pixel events
Once your feed is uploaded, you will need to ensure that your Facebook pixel is configured with a few essential events.
View Content must be tracked to determine which product ID, category or collection a users has viewed on your website.
Add to Cart should also be tracked
so that you can advertise the products in a user’s basket, or even offer a special voucher code for a few dollars off their order to help beat abandonment rates.
Purchases should be tracked so that you can exclude users from being remarketed products that they have already purchased. This is a great way to ensure that remarketing doesn’t become too much of an annoyance, and keep the customer coming back to look for their next purchase.
Although some plugins and e-commerce platforms will help you to handle this pixel installation automatically, you might have to make some customisations to pass the necessary data through to Facebook. If so, send your developer this guide so that they can ensure that it’s working correctly. You can also verify that your pixel is installed, and see which events are tracked using the Facebook Pixel Helper extension for Chrome.
If you are installing manually it is important to note that you will need to pass values for price and also a unique content ID, which Facebook can use to connect the products that have been viewed with those in your feed. If you are not using a plugin, this is something a developer will have to help you with.
For example, in the above image we can see that after I visited a product page and added an item to cart, my “View Content” and in this case “Subscribed Button Click” (which is acting as Add to Cart) events were fired, indicating that the correct events are tracked.
If you are installing these events yourself, I would recommend doing so with a tag manager tool, such as Google Tag Manager. This makes it simple to deploy modified tracking pixels on specific pages, as you can make rules which define when specific events are fired.
How easy or difficult the above is to set up will largely depend upon whether or not you have a developer to help you, or if you are using a shop system with a suitable plugin.
Segmenting Your Catalog with Product Sets
In order to serve your users the most relevant product ads, you can segment your product feed so that certain ads target specific niches or groups. An obvious example of this might be a clothing store looking to target men and women with seperate retargeting ads, so that they only see specific clothing categories, or both see a unisex catalogue.
There are two different ways that this segmentation can be achieved:
Create an entirely separate feed for each segment
Create multiple product sets within a single feed to group products
The benefit of creating a separate feed is that it can be easily handled by your e-commerce software. Most feed generation plugins will allow you to set rules on which products should be included in the list, and so if this information is readily available in your shop backend, you can use this simple method.
This approach makes most sense when the segmentation is broad and fairly defined, such as in the case of gender targeting, as it is unlikely that you will want to retarget men with ladies’ clothing unless you’re going after a very specific demographic. And even if that’s your business then just make them their own feed!
Product sets are more powerful when it comes to deeper segmentation, and creating cross selling rules within your feed. For example, if you know that users that purchase a wireless home speaker are likely to be interested in purchasing a wall mounting wireless home speaker stand, you can create rules within your product ads to serve products from a specific product set depending on past user behaviour.
It also stops you from having to generate a new feed for every single group of users, which is especially time saving when you are in the testing phase, trying out new combinations for cross promotion all the time.
Product sets are defined in your “Catalog” settings using the “Product Sets” tab.

They are created using data that already exists within your shopping feed, and can be defined by using simple rules based on the attributes that you have assigned. Most feed plugins allow you to assign products additional custom fields just for this purpose, and the richer the data in your feed, the more you can segment.
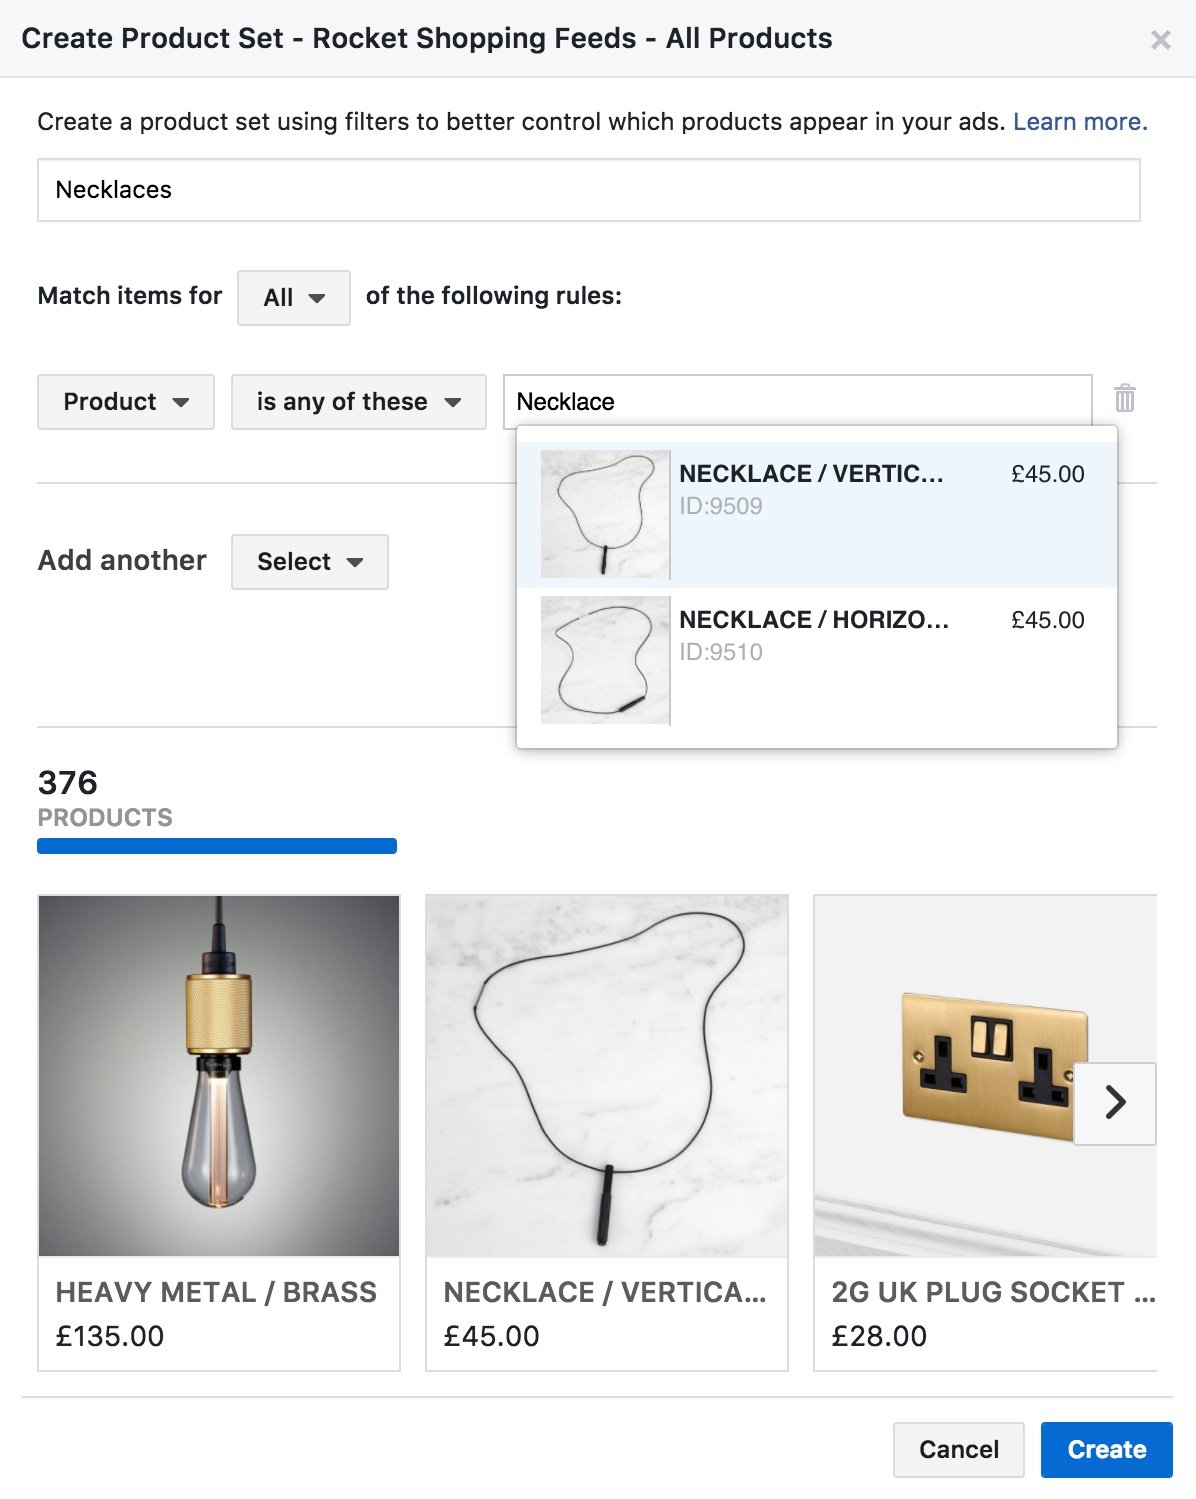
However, it is also possible to add products manually to a set, so if you don’t want to bother updating attributes in your webshop backend, you can just compile your sets manually. Obviously this could be time consuming if you have a lot of products!
Creating your dynamic product ad campaigns
Once your catalog has been successfully uploaded, and product sets defined, it’s time to use the Facebook Ad Manager to create your ads.
The Campaign
Start off by adding a new campaign and selecting the Catalog objective, and naming your campaign.
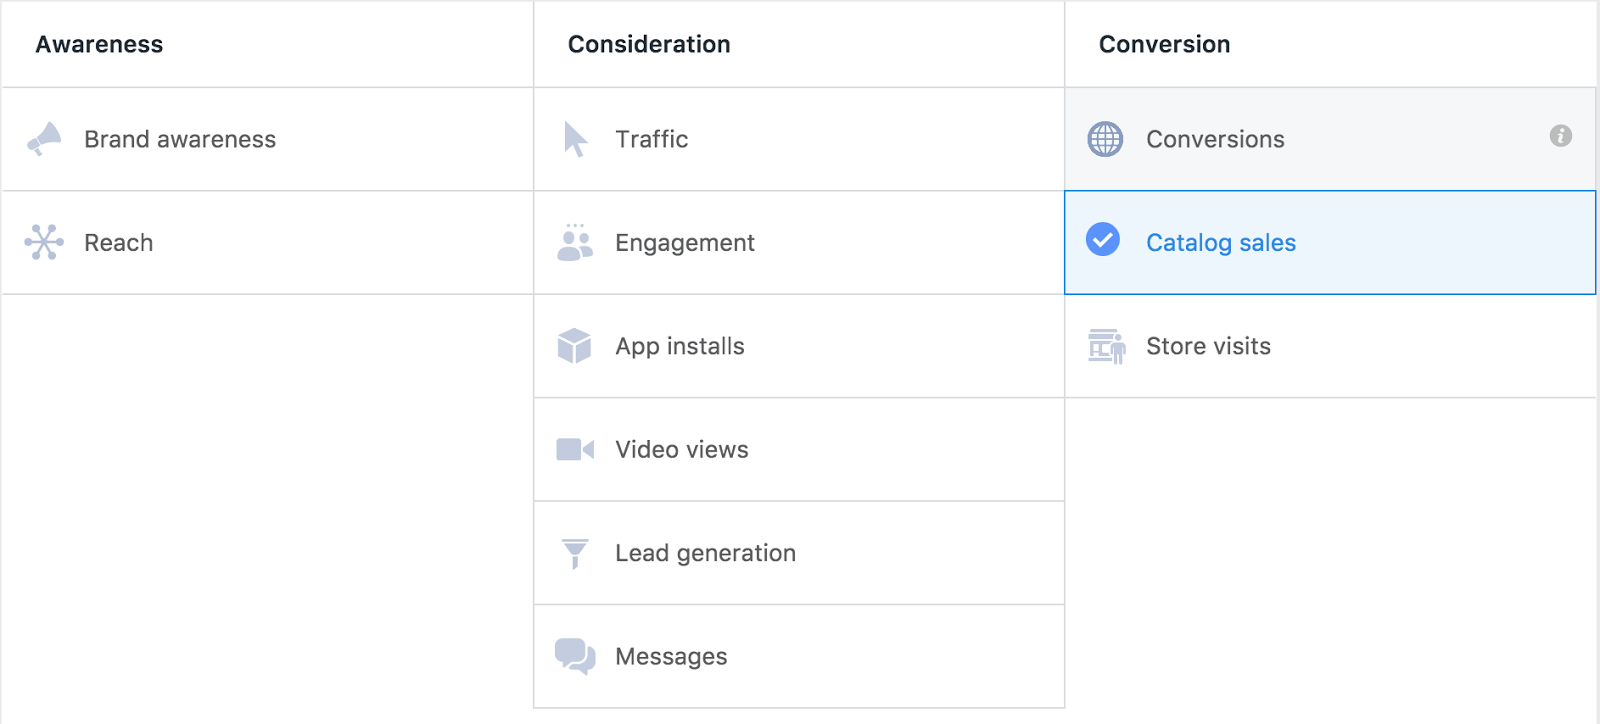
This is a special goal for dynamic product ads, which gives us different ad set targeting options so it’s important to choose this option.
The Ad Set
In the ad set configuration you should first choose the product set that you want to remarket. In this case I’m going to show users products that they viewed or added to basket, and these could be from any category so it makes sense to include all products.
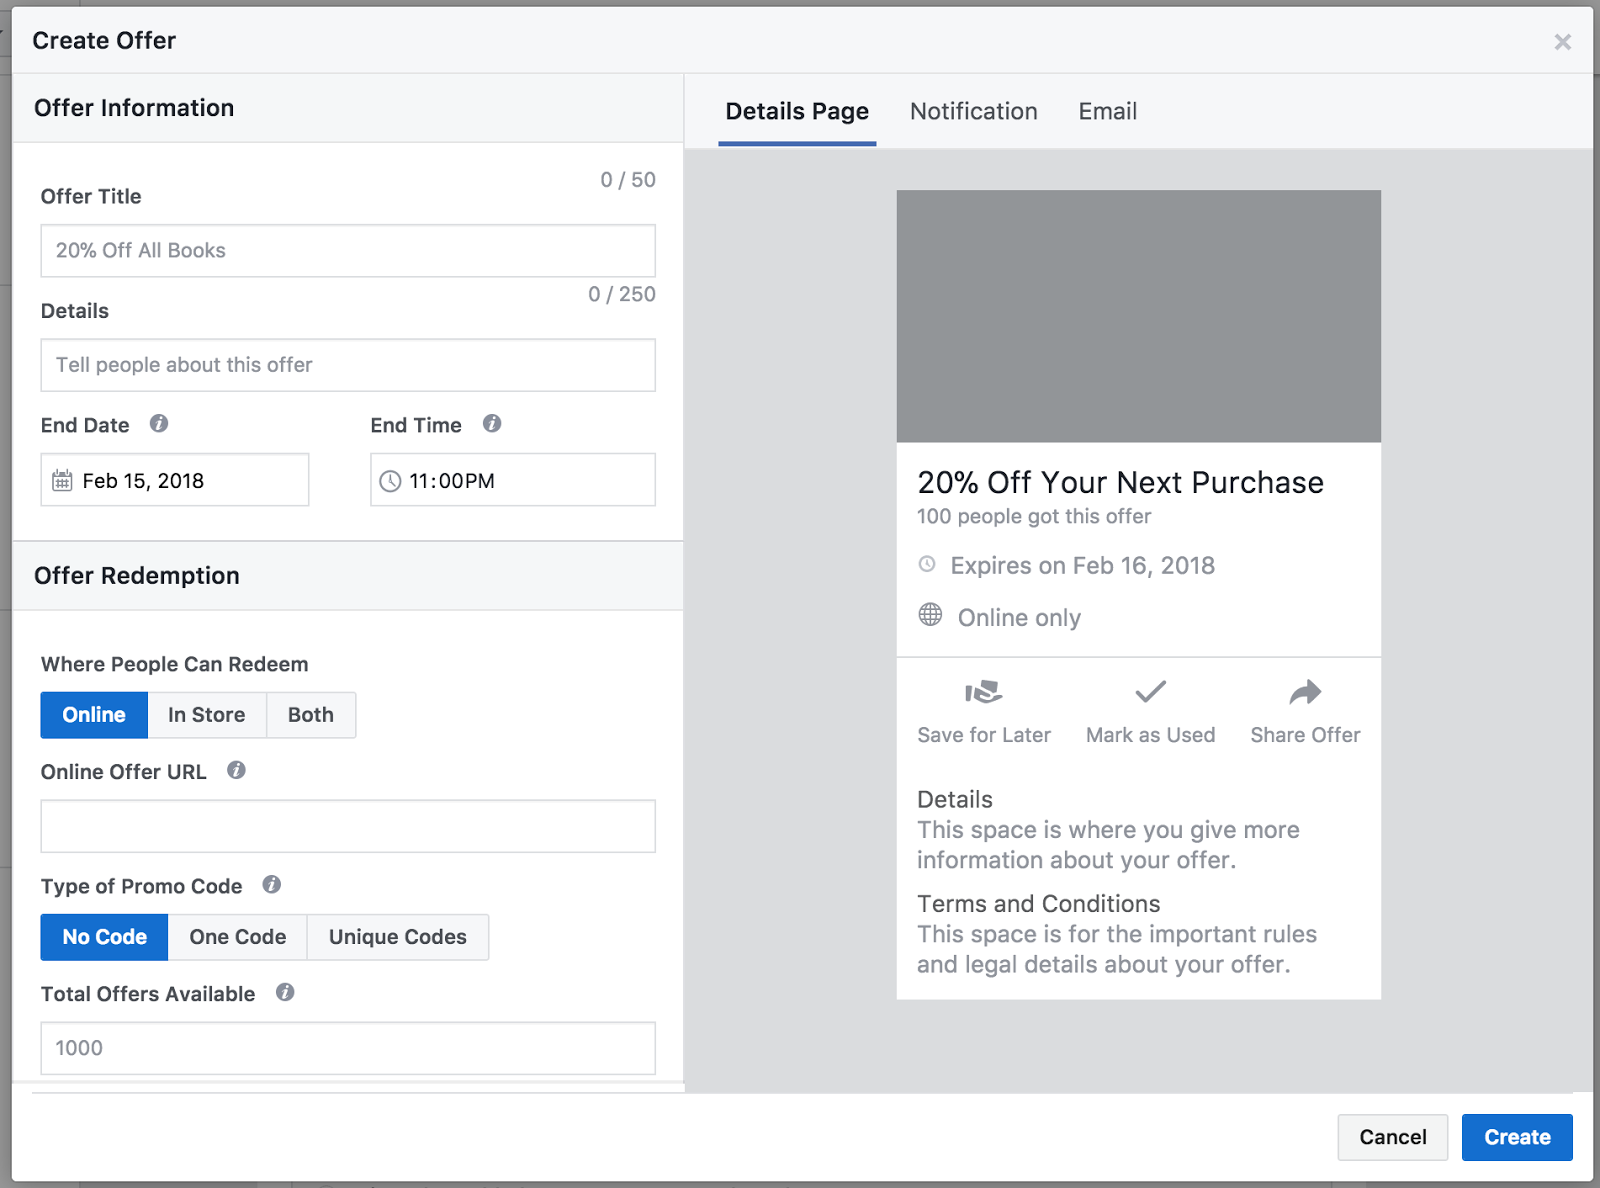
Next there is a configurable offer option. If activated you can set reminders for users to use a time sensitive voucher code to encourage conversion. I might typically add this for users that have abandoned their shopping carts, as they are further down the sales funnel, but I don’t want to offer discounts to those just browsing, so I will turn this feature off.
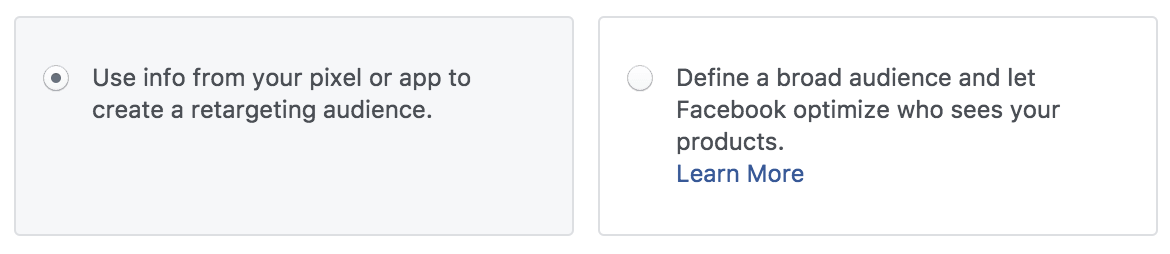
The two audience options allow you to either target website visitors that viewed specific products, or the broad audience of those that “expressed an interest in your products” but didn’t necessarily visit your site. This is a good option if you are struggling to populate your remarketing list.
Next we can define our remarketing audience rules. There are four preset options available that cover the majority of use cases and a custom option. The features in this section are really fantastic, and Facebook makes it very easy and intuitive to set up quite advanced targeting options. We’ll talk about strategies later on in the article in more detail, but for now I’m going to choose the first option to show users products that they viewed or added to cart in the past 14 days.

If you want to restrict your audience to a geographic region, or to target specific interest groups, fans or event attendees, then you can do so using the “Show advanced options” link.
Product ads can run on Facebook, Instagram and the Audience Network, so you can select your placements from the list. I prefer to split the platforms into separate campaigns, so I will select “Edit Placements” and choose Facebook news feed and limit my ads to a single placement.
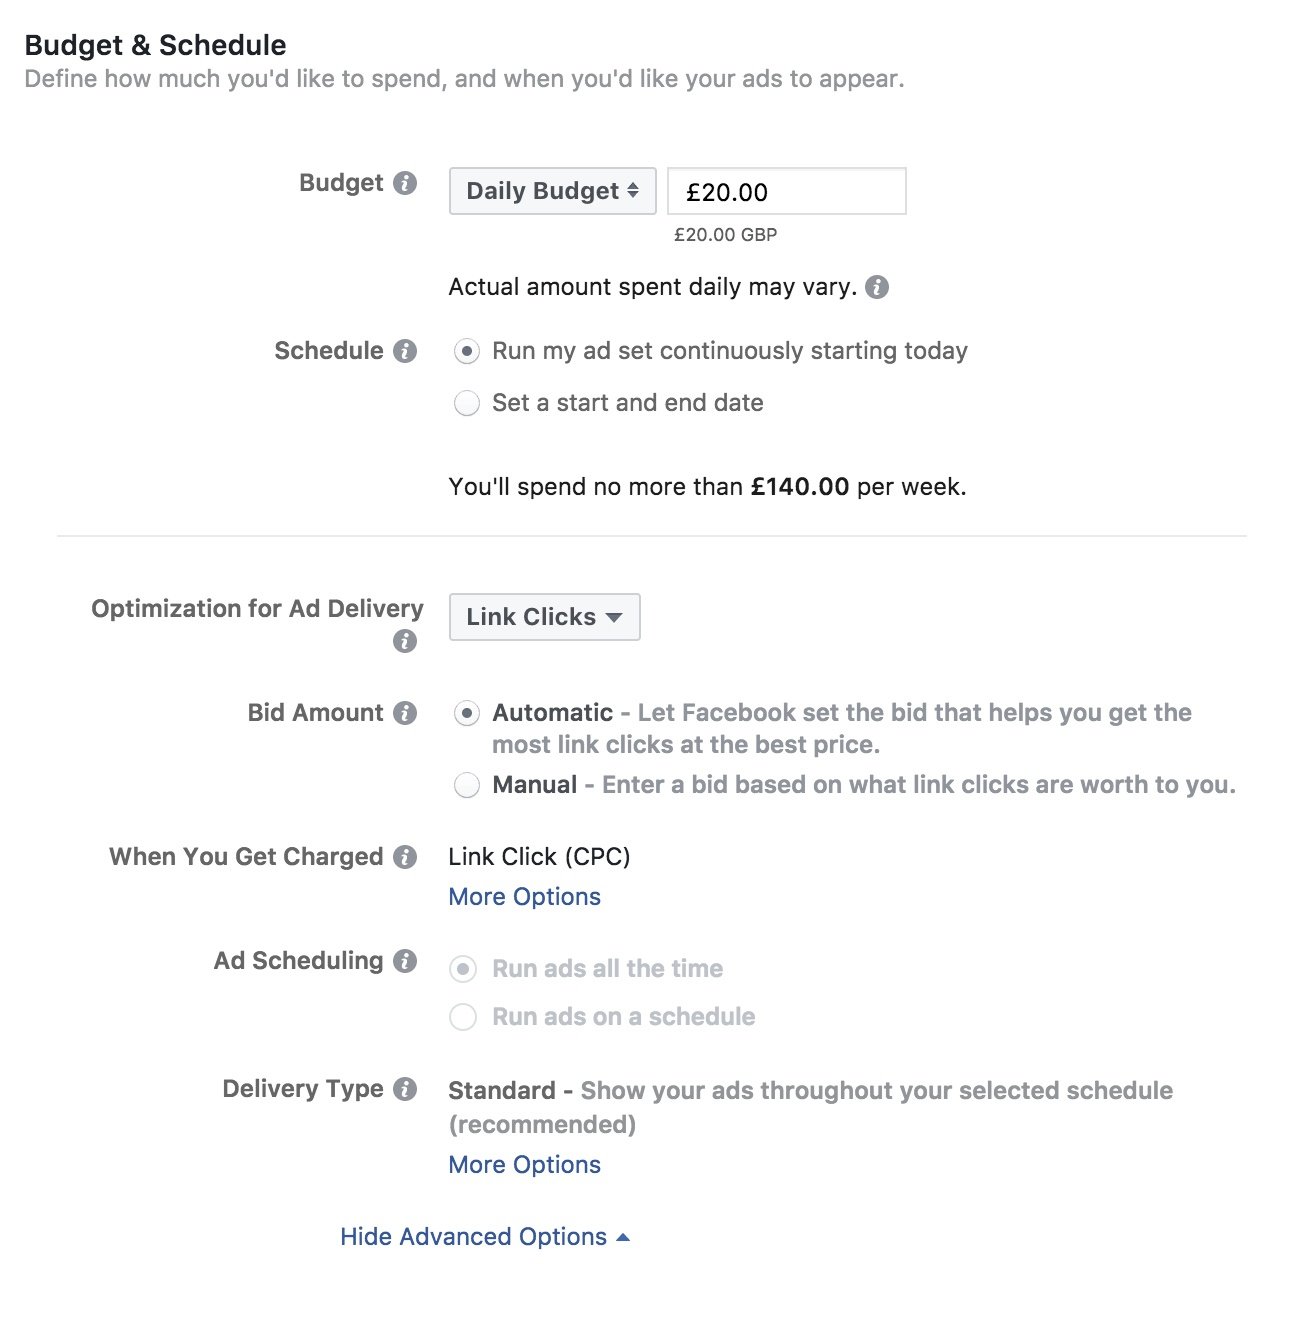
I’m going to leave my ad delivery settings to optimise for link clicks, as I like to manage the frequency of users viewing my ad through manual cost per click bidding. However I’ll start off with automatic bids so that I can adjust the bid manually once I start getting data from my ads.
I’m leaving the ad schedule set to default and sticking to the standard delivery method, to ensure I don’t pummel my website visitors too intensively.
Now name your ad set something descriptive of the targeting that you have chosen (such as “Viewed Product in 14 Days” and move on to create our first dynamic ad!
The Ad
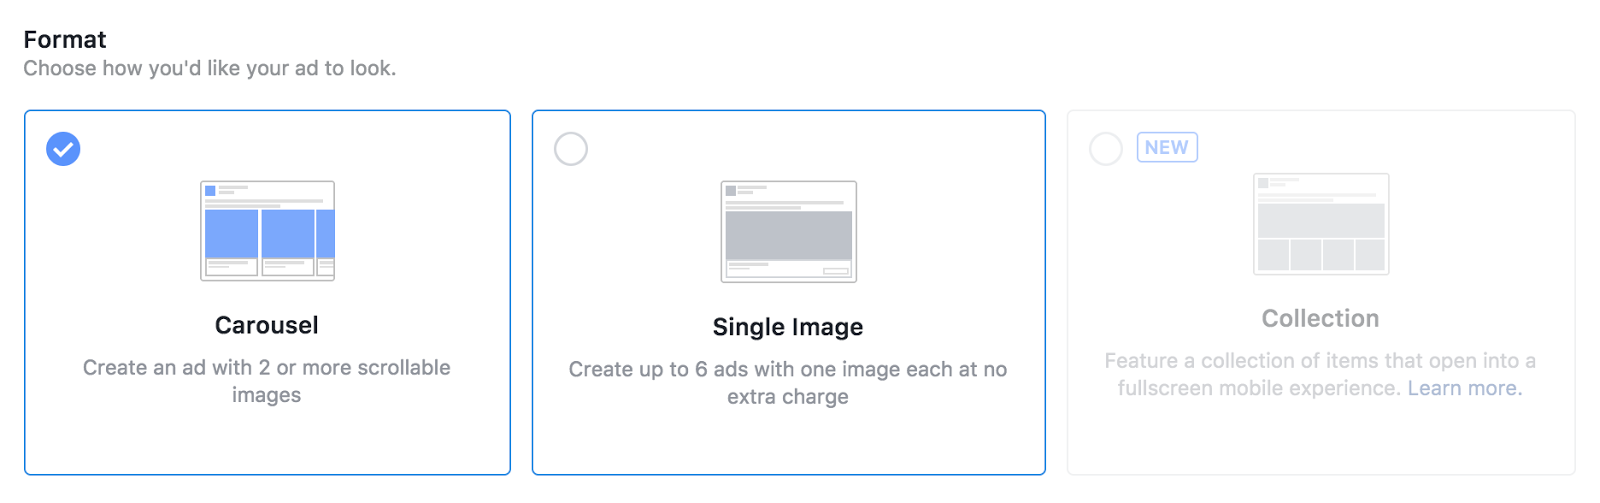
In the format section you can select single links, carousel or even the new collection format. I want to show multiple products in the newsfeed so I think a carousel is a great way to do that.
I want users to see my products immediately, so I will uncheck the box to add a card at the beginning of the ad, and leave the additional card at the end linking to my site active.
The beauty of these creatives is that the ad is largely automated. All you need is a bit of (optional) copy for the post itself, and to define which information from your product feed is pulled into the ad. This is by default set to product title and price, but you could add in other fields such as brand, material or even a custom value that you have created in your shopping feed. Easy!
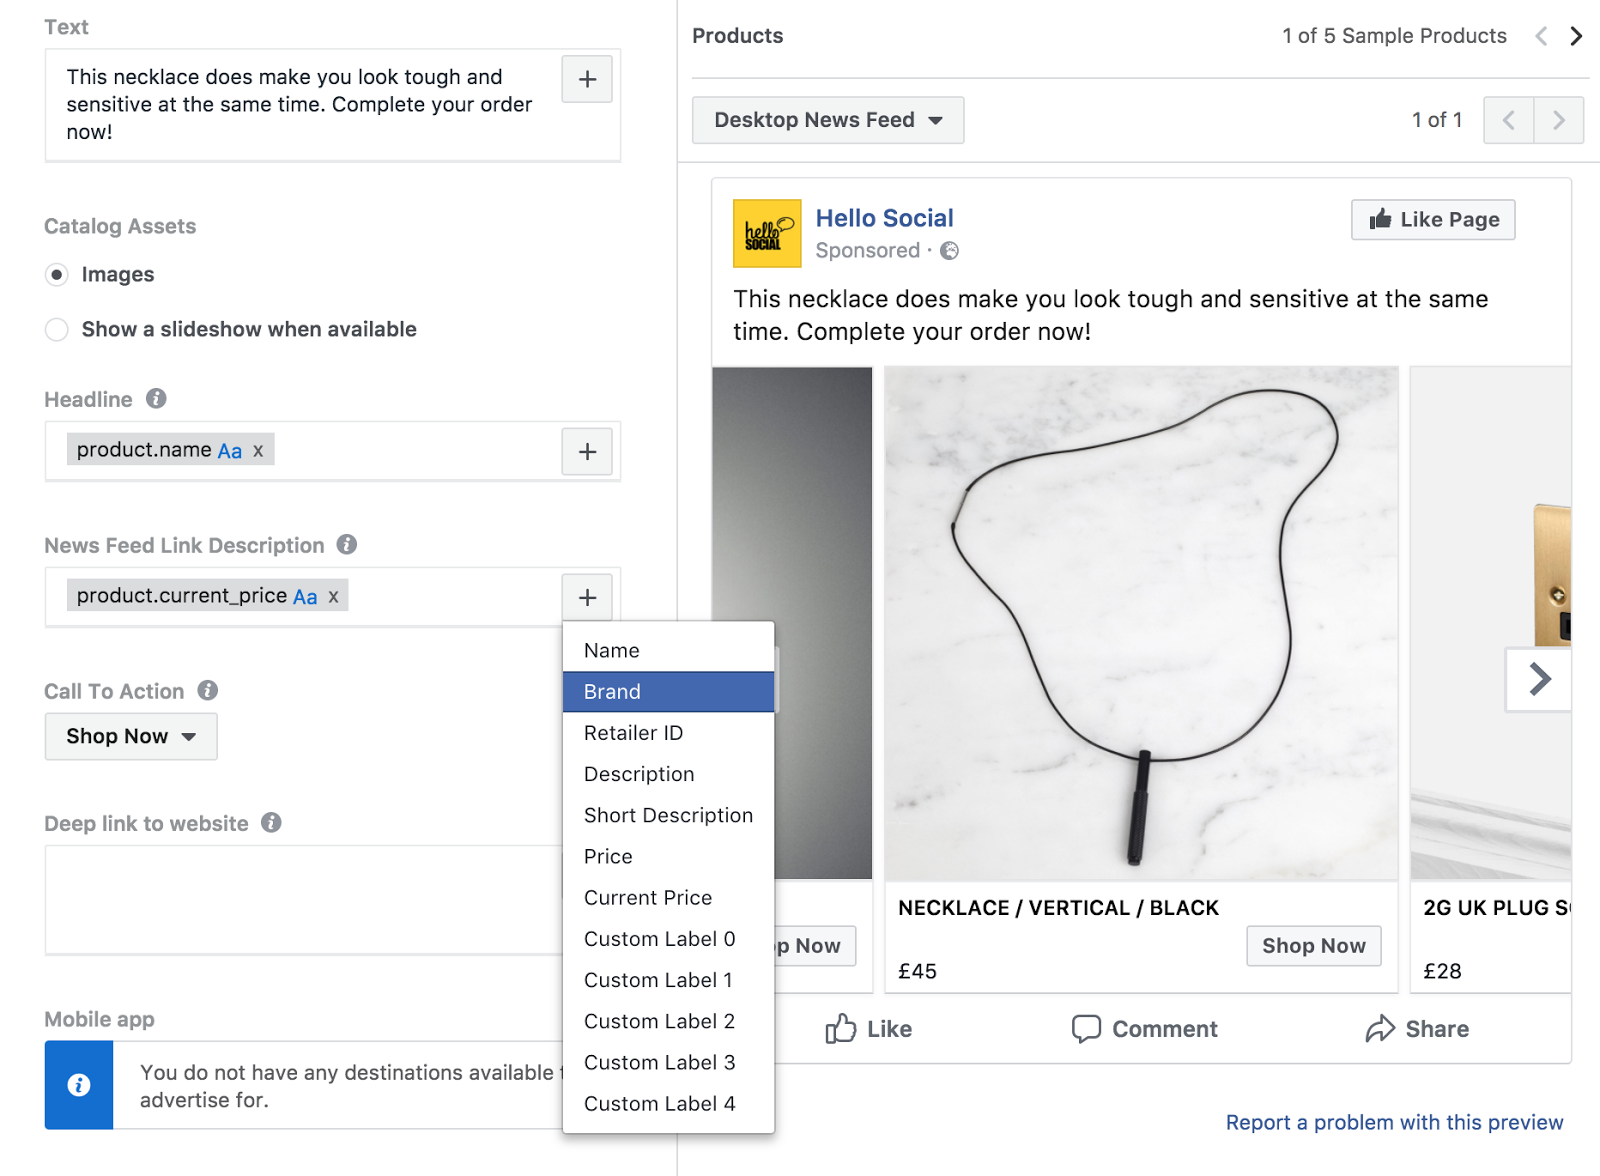
Finally choose your CTA button and don’t forget to tracking parameters to your URL in order to track your campaigns later in Google Analytics.
If you need help setting this up, then this video explains what UTM parameters are and how to use them.
Now your ad is all ready to roll so just click to confirm and start targeting your audience!
Part 3: Funnel Focus: A Great Starting Strategy
How you choose to remarket to your audience will depend on your industry, but in general the principle of specificity and segmentation should apply.
Why do we remarket dynamically? Because it allows us to serve users with more relevant ads.
Now obviously, this means that we show users specific products that they have previously viewed, but creating this campaign or ad set is a no brainer.
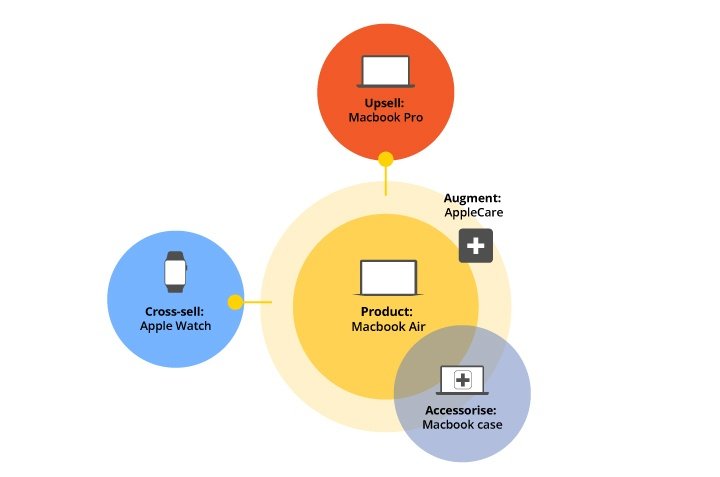
Things really get interesting when we start looking at upselling (eg. “You looked at a VW Golf, what about an Audi instead?”), augmenting (eg. “You bought a new laptop, what about some insurance?”) , accessorising (eg. “You bought a GoPro, what about this tripod”) and cross-selling (eg. “You bought a synthesizer, what about this drum machine?”) to our audience. That means that creating a robust product feed (or feeds) with enough data to segment and target so that we can put this strategy into action.
Let’s break our users down into three really simple categories to start with.
Step 1: Users that have viewed a product
Step 2: Users that have added to basket
Step 3: Users that have purchased a product
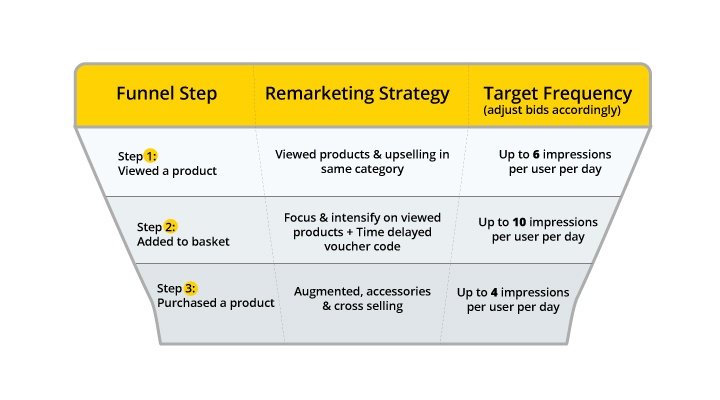
Immediately we can see that each group will require a different remarketing strategy.
Step 1 users that have viewed but not purchased will want to see primarily the products that they have viewed. They might also be ripe for upselling, so consider including a product set of premium priced items in the same category.
Step 2 are further along the funnel and have added to cart. This means that they are at the tipping point, and so it’s time to focus on the products they have browsed, and potentially increase your bids on these users for higher impressions, utilizing more ad placements such as the sidebar or using the audience network.
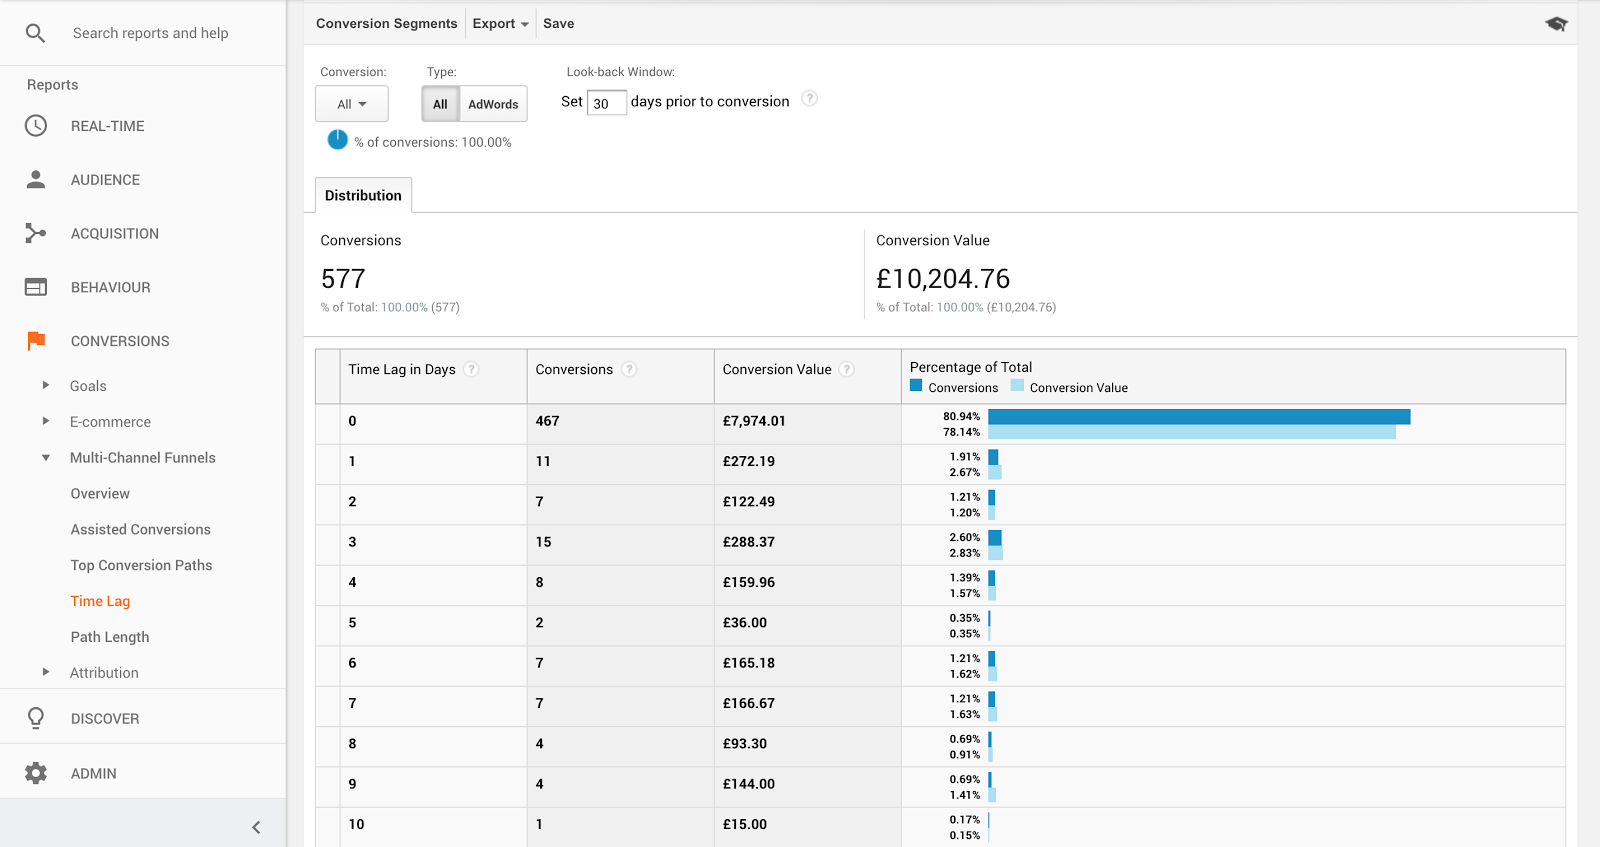
If you’re feeling really crafty, then you could set up an additional campaign to target users that have added to cart but not purchased within a time frame that exceeds your site average time to purchase. This data is available in Google Analytics by visiting Conversions > Multi-Channel Funnels > Time Lag.
In the below example, most conversions took place on the same day so that I might decide to remarket products to users that had added to cart but not purchased two days before with a special voucher code for a few bucks off.
Step 3 are our users that have recently completed a purchase. There’s nothing worse than finally caving into those retargeting ads, only to be aggressively served ads from the product you have just purchased.
These users are perfect for your augmented, accessories and cross-selling strategies.
For example, if I am selling outdoors equipment, I might want to create a remarketing ad for everyone that purchased a tent, to whom I might want to promote camping accessories such as portable gas stoves, head torches, a lovely rubber mallet and some pegs.
Simple, I just create a new dynamic product ad set, that cross-sells users that fired the facebook purchase event on a product from my tent category, and show them dynamic product ads using products in my camping accessories category.
Can you feel the power?! I’m trembling.
As you can see, with the segmentation options available the possibilities are only limited by the scope of your product range, and the depth of your pockets. It’s easy to get carried away creating targeted ads, and if you get a kick out of that then go nuts. However, just running some simple remarketing is a great option as it is, so don’t be scared off if the above all sounds like nerdy garble to you.